Introduction
The world of coffee is an intricate tapestry, woven with the threads of flavor, aroma, and technique. Among the many brewing methods, pour-over stands as a testament to the artistry and precision that coffee-making can embody. It’s a process that invites you to be not just a brewer, but a craftsman, carefully orchestrating the elements to create a symphony of taste in your cup. In this comprehensive guide, we’ll take you on a journey through the nuances of the pour-over method, providing you with a step-by-step tutorial to master this beautiful dance of water and coffee grounds. By the end of this exploration, you’ll possess the knowledge and skills to brew a pour-over coffee that not only tantalizes your taste buds but also leaves a lasting impression.
The Poetry in Pour-Over
Pour-over, with its elegant simplicity, allows for an intimate connection between the brewer and the brew. Unlike automated methods, it requires a hands-on approach, enabling you to fine-tune every aspect of the brewing process. This level of involvement ensures that the flavors are extracted precisely, resulting in a cup that showcases the unique characteristics of the coffee beans.
Gathering Your Instruments: The Conductor’s Baton
Before you embark on your pour-over journey, it’s imperative to assemble the necessary equipment, which serves as your orchestra for this brewing symphony:
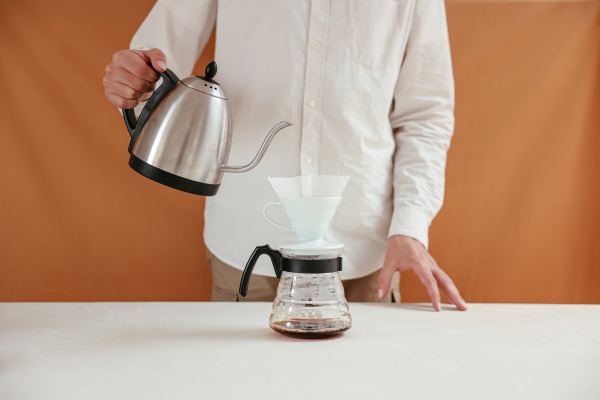
A Pour-Over Cone: This vessel, which can be fashioned from ceramic, glass, or stainless steel, cradles the coffee grounds and directs the flow of water.
Filters: Choose high-quality, cone-shaped filters that snugly fit your pour-over cone. They play a crucial role in ensuring a clean cup, free from unwanted sediment.
Freshly Ground Coffee Beans: Opt for a medium grind, akin to the texture of sea salt. This consistency allows for even extraction and imparts a balanced flavor profile.
A Kettle with a Narrow Spout: The spout of the kettle is your baton, conducting the water with precision. Look for a kettle with a controlled flow for accurate pouring.
A Scale: This acts as your metronome, ensuring precise measurements of both coffee grounds and water.
A Timer: Like the conductor keeping time, a timer ensures that each step of the process is meticulously executed.
The Dance Steps: Brewing Process
Step 1: Preheat and Rinse
The overture to any pour-over performance is the preheating of your instruments:
Boil Water: Heat water to just below boiling, around 200°F (93°C). This ensures that the water is at the optimal temperature to extract the flavors from the coffee grounds.
Preheat Cone and Mug: Place the pour-over cone over your mug and rinse it with hot water. This preheats the cone and removes any paper residue from the filter. Discard the water from the mug, and you’re now ready to commence the brewing process.
Step 2: Measure and Add Coffee
This step is akin to the opening notes of a symphony, setting the tone for the entire performance:
Weigh Coffee: Using the scale, measure out the desired amount of coffee grounds. A standard ratio is 1 gram of coffee to 15 grams of water, but feel free to adjust based on your taste preferences. This is where you can start to personalize your brew.
Add Coffee to the Filter: Place the coffee grounds into the rinsed filter in the pour-over cone. The even distribution of grounds is crucial for an even extraction.
Step 3: The Bloom
Just as a musical piece has moments of suspense and anticipation, the bloom in pour-over is a critical element:
Start the Timer: Begin the timer. This marks the initiation of the bloom phase.
Initial Pour: Pour hot water evenly over the coffee grounds, ensuring they are all saturated. Start from the center and spiral outwards. This allows the coffee to “bloom,” releasing trapped gases. Let it bloom for 30 seconds. During this time, you’ll witness the coffee bed swelling and expanding—a sign of freshness and quality beans.
Step 4: The Pour
As the performance progresses, it’s time for the main act—the controlled pour:
Begin Pouring: After the bloom, continue pouring water in a steady, controlled manner. Pour in a circular motion, starting from the center and moving outwards. The goal is to maintain an even saturation of the grounds.
Maintain Water Level: Keep an eye on the water level in the cone. It should never be completely empty. This ensures a consistent flow of water through the coffee bed, facilitating an even extraction.
Consistency is Key: Like a musician maintaining rhythm, aim to maintain a consistent pouring rate. This promotes uniform extraction and leads to a balanced flavor profile.
Step 5: Brewing Time
Just as a symphony has movements of varying intensity, the brewing time in pour-over is a dynamic element:
Monitor the time and aim for a total brewing time of approximately 2.5 to 3.5 minutes from the start of pouring. This time frame allows for a balanced extraction, capturing the full range of flavors from the coffee grounds.
Step 6: Enjoy the Fruits of Your Labor
As the final notes of a musical piece linger in the air, it’s time to savor the culmination of your pour-over performance:
Once the pouring is complete and the water has filtered through the grounds, you’re left with a beautifully brewed cup of pour-over coffee. The aroma will envelop you, offering a preview of the complex flavors that await.
Fine-Tuning Your Technique
Just as a seasoned musician refines their craft over time, so too can you fine-tune your pour-over technique:
Experiment with Grind Size: Adjusting the grind size of your coffee beans can significantly impact the extraction process. Finer grinds may lead to a more intense flavor, while coarser grinds can result in a lighter, more delicate brew. Take the time to explore and find the grind size that resonates with your palate.
Controlled Pouring: Practice your pouring technique to achieve a steady, consistent flow. This helps ensure an even extraction and balanced flavor profile. Consider the kettle’s spout as an extension of your hand, allowing you to control the direction and speed of the pour.
Water Temperature: Pay attention to the water temperature. Slightly cooler water can highlight brighter, more acidic notes, while hotter water may emphasize richer, fuller flavors. Use your kettle’s narrow spout to precisely control the water flow, ensuring it’s at the desired temperature for each phase of the pour-over process.
Explore Different Bean Origins: Just as a musician might experiment with different instruments, you can explore the diverse world of coffee bean origins. Different regions impart distinct flavor profiles to the beans. Experiment with beans from various regions to discover your preferences. Explore the fruity notes of African beans, the chocolatey richness of South American beans, or the earthy undertones of Asian beans.
Conclusion: Your Journey in the Art of Pour-Over
In the world of coffee, mastering the pour-over method is akin to becoming a virtuoso musician. It invites you to become an active participant in the brewing process, allowing you to fine-tune each element to create a cup of coffee that suits your palate perfectly. As you embark on this journey, remember that practice is the key to mastery. Experiment with different grind sizes, water temperatures, and pouring techniques to discover what brings out the best in your chosen beans.
With time, you’ll develop an intuitive understanding of the delicate dance between water and coffee grounds, and you’ll be able to craft exceptional pour-over coffee with confidence. So, set up your stage, gather your tools, and let the graceful pour-over method become a cherished part of your coffee-making repertoire. Happy brewing!
